Bartleby

Publish books from your Mac or iPad.

Download Bartleby App Store Link Have a Question?

Current version: 1.0

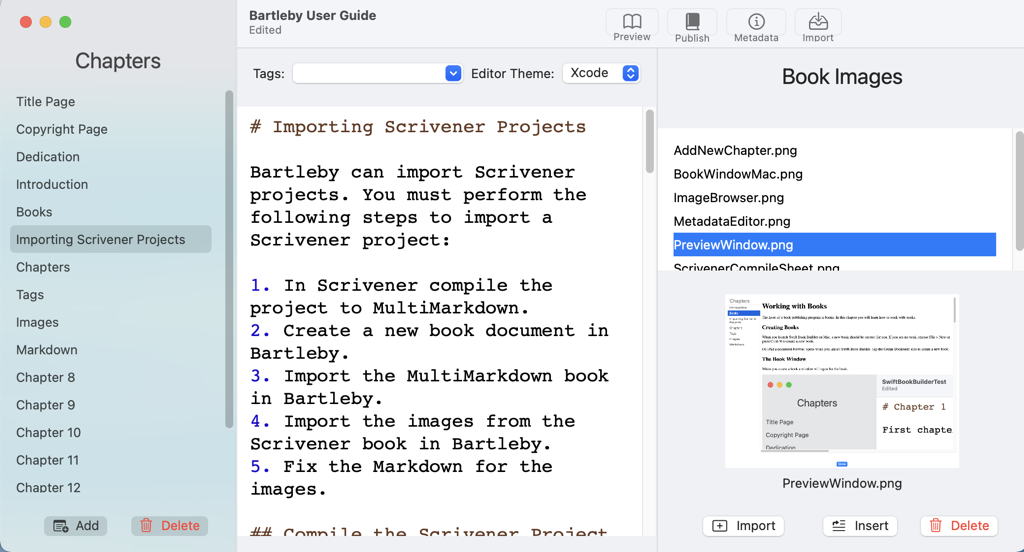
book window

Does Scrivener’s Compiling Confuse and Frustrate You?

Scrivener is a great tool for writing books. You can also use Scrivener to publish an EPUB or PDF book by compiling your project. Here’s where things get confusing and frustrating.

When you choose File > Compile in Scrivener, you get a sheet with an incomprehensible list of section layouts and a collection of settings that is so large it’s split into six sections for an EPUB book. You click the Compile button and hope things look OK. If they don’t, you’re going to have wade through the settings and section layouts and figure out what setting is causing the problem.

Writers have the following things to say about Scrivener’s compiling process:

  • “The thought of having to relearn how to compile makes me want to gouge my eyeballs out.”
  • “opaque, impenetrable, user-hostile mess”
  • “It’s just incredibly frustrating and time consuming”

All you want is a book that looks good without losing your sanity fiddling with compile settings.

Use Scrivener To Write and Bartleby To Publish

Save your sanity and eyeballs by using Bartleby instead of Scrivener to publish your book. Use Scrivener for what it does best, writing books, and use an app designed for publishing books to publish your book.

Compile your Scrivener project to MultiMarkdown and import it into Bartleby. For most books that’s 99 percent of the work. Click the Publish button, and Bartleby gives you a professional looking EPUB book you can sell at Amazon and other online book stores.

I Don’t Use Scrivener

Not using Scrivener? Write in Markdown, either in Bartleby or your favorite text editor. Let Bartleby handle the boring formatting details so you can concentrate on your writing.

Don’t know Markdown? Bartleby has a graphical user interface to mark the parts of your book that aren’t body text, such as chapter titles and section headings. For a novel the main work you have to do is tag chapter titles.

Sample Book

The Bartleby User Guide provides an example of an EPUB book that Bartleby generates.

Download Bartleby User Guide

System Requirements

Bartleby requires a Mac running macOS 12 or later or an iOS device running iOS 15 or later.

iOS Version

I recommend using an iPad with a physical keyboard. Being familiar with the iOS Files app will also help when adding a cover image or opening the published book in the Books app.

Mac Installation Instructions

  1. Download Bartleby.
  2. Double-click the zip file to expand it.
  3. Drag the Bartleby application to your Applications folder or wherever you want it to reside.
  4. Double-click the Bartleby application icon to launch Bartleby.

Creating a New Book

On Mac a new book should be created when you launch Bartleby. You can also choose File > New to create a new book.

On iOS tap the Create Document item to create a new book.

Entering a Book Title and Author

Click or tap the Metadata button in the toolbar.

A sheet opens to enter the book’s title, author, and unique identifier. If you have an ISBN number for your book, use that as the unique identifier. Click or tap the Done button when you’re done to save the title and author.

Choosing a Book Cover

Click or tap the Metadata button in the toolbar.

A sheet opens. Click or tap the Choose Cover File button to choose the cover image file. Click or tap the Done button when you’re done to save the cover.

Renaming a Chapter

On Mac select a chapter from the chapter list. Press the Return key. Type the new chapter name.

On iOS tap the Edit button above the chapter list. Tap on the chapter to change its name.

Adding a Chapter

Click or tap the Add button below the chapter list.

On Mac the new chapter appears below the selected chapter. On iOS the new chapter appears at the end of the list. Tap the Edit button to move the chapter to the desired location in the chapter list.

Removing a Chapter

On Mac select the chapter to remove and press the Delete key.

On iOS tap the Edit button above the chapter list. Tap the Delete button next to the chapter you want to remove.

Empty chapters do not appear in the published book so you shouldn’t have to remove chapters often.

Reordering Chapters

On Mac select a chapter from the chapter list and drag it to the desired position in the chapter list.

On iOS tap the Edit button above the chapter list. Next to each chapter is a button with three horizontal lines. Tap the button and drag the chapter to the desired position in the chapter list.

Entering Text

Select a chapter to show its contents in the text view. Type in the text view.

Changing the Look of the Text Editor

Select a theme from the Editor Theme menu.

Remember the editor theme setting applies only to Bartleby’s text editor. The editor theme has no effect on your published books.

Tagging Text

Select the text you want to tag and choose a tag from the Tags menu.

Text is initially set to be body text (paragraph) so you don’t have to tag every paragraph in your book. Tag only things like chapter titles and section headings.

If you accidentally choose the wrong type of tag, remove the markup text using the text view.

You can also use Markdown syntax to tag text. For code blocks, the Markdown syntax of indenting the code block does not work. Enter three backticks in a line above and below the code block.

Creating Lists

Start a line with an asterisk and a space to create an unordered list.

* Apples
* Bananas
* Coconuts
* Grapes

Start a line with a number and a dot to create an ordered list.

1. First
2. Second
3. Third

Previewing a Book

Click or tap the Preview button in the toolbar. On Mac you can also choose Book > Preview.

A sheet opens with a list of chapters on the left and a preview on the right. Select a chapter from the list to preview that chapter’s contents.

Publishing a Book

Click or tap the Publish the button in the toolbar. On Mac you can also choose Book > Publish. A panel will open for you to choose a name for your book and a location to save it.

Adding Images

Start by importing images to the book.

  1. Click or tap the Import button at the bottom of the image browser.
  2. Choose the images you want to add in the Open panel.
  3. Click the Open button.

After importing an image, you can insert it in your book.

  1. Select the chapter where you want to insert the image.
  2. Click or tap on the location in the chapter text where the image should appear.
  3. If you have alt text for the image, select it in the text view.
  4. Select the image from the list in the image browser.
  5. Click or tap the Insert button.
  6. Tap the Done button on iOS.

The new image should look like similar to the following in the chapter text:

![](ImageName.png)

To add alt text to the image for people with impaired vision, add the alt text inside the square brackets.

![Image Description](ImageName.png)

Current Bugs and Limitations

  • The only available publishing format is EPUB.
  • When adding images on iOS the images must be in Bartleby’s Documents folder.
  • Toolbar buttons may randomly disappear on iOS. A workaround to restore the buttons is to tap the Preview button and tap the Done button in the sheet.

On Mac when saving a book, you must choose Book from the File Format menu. Book is the initial choice so you shouldn’t have to do anything to save in the Book format. If you save the book as an EPUB, you won’t be able to open it in Bartleby.

Privacy Policy

Bartleby does not collect any personal data.